Low poly terrain using mesh geometry
Note: Support for 3D on mobile devices may vary, view the system requirements for more information.
This sample shows you how to create a low poly landscape. Low poly models usually have very few polygons and are less computationally intensive. They can be used for playful, abstract views of the world for example in touristic or fantasy maps.
A low poly terrain model is created using Mesh geometry. Custom 3D models like the trees can be published as WebStyles from ArcGIS Pro to ArcGIS Online and placed in the scene. The height value of each tree location is queried synchronously using elevationSampler. ElevationSampler.queryElevation() is used for client-side synchronous queries, as opposed to ElevationLayer.queryElevation().
1. Set up the scene
First, create a Map and display it in a local SceneView clipped to a specific extent:
const extent = new Extent({
  xmax: 950005,
  xmin: 943783,
  ymax: 5998448,
  ymin: 5994465,
  spatialReference: SpatialReference.WebMercator
});

const map = new Map({
  ground: "world-elevation"
});

const view = new SceneView({
  container: "viewDiv",
  map: map,
  viewingMode: "local",
  clippingArea: extent,
  camera: {
    position: {
      spatialReference: SpatialReference.WebMercator,
      x: 949489,
      y: 5994263,
      z: 1339
    },
    heading: 322,
    tilt: 82
  }
});
2. Create terrain as a mesh geometry
Use the createFromElevation() method in the meshUtils object to create a mesh geometry from a ground layer. You can then attach the mesh geometry to a Graphic with a MeshSymbol3D.
meshUtils.createFromElevation(map.ground.layers.getItemAt(0), extent, {
  demResolution: demResolution
})
.then(function(mesh) {
  const graphic = new Graphic({
    geometry: mesh,
    symbol: {
      type: "mesh-3d",
      symbolLayers: [{
        type: "fill",
        material: {
          color: [247, 237, 163]
        }
      }]
    }
  });

  view.graphics.add(graphic);
});
This creates a mesh with smooth shading using real elevation values:
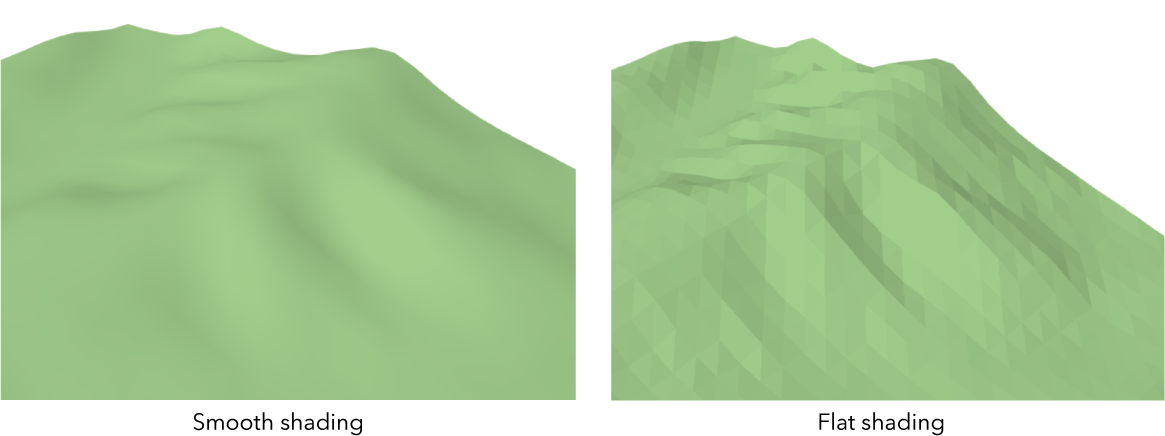
To create the low poly effect the MeshComponent.shading is changed to flat and the elevation values are multiplied with an exaggeration factor:
mesh.components[0].shading = "flat";

const vPositions = mesh.vertexAttributes.position;

// Every third element in the positions array represents the height value
// [x1, y1, z1, x2, y2, z2, ...]
for (let index = 0; index < vPositions.length; index += 3) {

  // Modify the height position by applying the exaggeration
  vPositions[index + 2] = vPositions[index + 2] * exaggeration;
}
To mimic real terrain, colors can be applied based on the height. To apply colors to the mesh geometry, we generate a canvas using the Canvas API and set it on the material color in the MeshComponent.
The underlying ImageData for a canvas is generated based on the z values in vertexAttributes.position:
const vPositions = mesh.vertexAttributes.position;

// Calculate the width and height of the canvas
// based on the number of vertices and the extent aspect ratio
const vertexCount = vPositions.length / 3;
const w = Math.round(Math.sqrt(vertexCount * extent.width / extent.height));
const h = Math.round(vertexCount / w);

// Create a 2D canvas and assign the colors for each pixel
// based on the height value of the mesh vertices
const canvas = document.createElement("canvas");
const ctx = canvas.getContext("2d");

canvas.width = w;
canvas.height = h;

// Set height based color values in the
// ImageData(https://developer.mozilla.org/en-US/docs/Web/API/ImageData)
// of the canvas
const imgData = ctx.createImageData(w, h);
let j = 0;

for (let i = 0; i < vPositions.length; i += 3) {
  const color = getColor(vPositions[i + 2]);

  imgData.data[j + 0] = color[0]; // r
  imgData.data[j + 1] = color[1]; // g
  imgData.data[j + 2] = color[2]; // b
  imgData.data[j + 3] = 255; // alpha
  j += 4;
}
ctx.putImageData(imgData, 0, 0);

// Set canvas on the mesh component color
mesh.components[0].material = {
  color: canvas
}

// Utility function that maps a height value to a color
function getColor(height) {
  if (height < 500 * exaggeration) {
    return [149, 195, 50]; // green
  }
  else {
    if (height < 700 * exaggeration) {
      return [209, 148, 81]; // brown
    }
  }
  return [255, 255, 255]; // white
}
The texture created with the canvas is by default multiplied to the color value set in the MeshSymbol3D. Remove the material in MeshSymbol3D to display the color assigned in the canvas.
3. Add trees as web style symbols
A low poly tree model was created and then published to ArcGIS Online using ArcGIS Pro. See the Share a web style tutorial for more details on how to publish your own 3D models. A PointSymbol3D with an ObjectSymbol3DLayer referencing the published style as a resource is used to symbolize the trees.
const treeSymbol = {
  type: "point-3d",
  symbolLayers: [{
    type: "object",
    resource: {
      // The tree model was imported to ArcGIS Pro and published as a WebStyle
      // See details on how to do this here: http://pro.arcgis.com/en/pro-app/help/sharing/overview/share-a-web-style.htm
      href: "https://jsapi.maps.arcgis.com/sharing/rest/content/items/4418035fa87d44f490d5bf27a579e118/resources/styles/web/resource/tree.json"
    },
    height: 200,
    anchor: "bottom"
  }]
};
Create an elevationSampler object with ElevationLayer.createElevationSampler to synchronously query elevation for the generated points. This aligns the points to the elevation of the mesh.
map.ground.layers.getItemAt(0).createElevationSampler(extent, {
  demResolution: demResolution
})
.then(function(elevationSampler) {

  // Get height for the tree
  const tree3D = elevationSampler.queryElevation(tree);

  // Apply exaggeration
  tree3D.z = tree3D.z * exaggeration;
});
Graphics representing trees are created entirely client side and then added to the scene:
const treeXYCoordinates = [
  [949511.0269866717, 5996737.260347401],
  [948349.0915666509, 5995392.784148848],
  ...
];

// Create an elevationSampler to synchronously query the elevation
// at tree locations
map.ground.layers.getItemAt(0).createElevationSampler(extent, {
  demResolution: demResolution
})
.then(function(elevationSampler) {

  for (let i = 0; i < treeXYCoordinates.length; i++) {

    // Generate a 2D point within the extent of the SceneView
    const tree = new Point({
      x: treeXYCoordinates[i][0],
      y: treeXYCoordinates[i][1],
      spatialReference: extent.spatialReference
    });

    // Query elevation and apply exaggeration
    const tree3D = elevationSampler.queryElevation(tree);
    tree3D.z = tree3D.z * exaggeration;

    view.graphics.add(new Graphic({
      geometry: tree3D,
      symbol: treeSymbol
    }));
  }

});