 Hide Table of Contents
 Tutorials
 About the API
 Work with the API
 Graphics and feature layers
 Popups and Info Windows
 Geoprocessor
 Operations Dashboard
 Create extensions
 Mobile
 ArcGIS Server Services
 References
 What's New archive
esriRequest is a utility method to retrieve data from a web server. Data can be static (stored in a file on the web server), or it can be dynamic (generated on-demand by a web service). esriRequest can handle the following formats:
Prerequisites
Before a request can be made, some information is required:
- Location of the data i.e., URL
- For web services, any required parameters and appropriate values
- Data format
Once these are known, there are two requirements to use esriRequest.
- Import the module that has the source code for the function:
require(["esri/request", ... ], function(esriRequest, ... ) { ... }); - If needed specify the location of the proxy. A proxy is a simple script that runs on a web server. It is automatically used by esriRequest for certain types of requests. More information is available on the proxy set up page.
Syntax
var request = esriRequest({
  // Location of the data
  url: "<String>",
  // Service parameters if required, sent with URL as key/value pairs
  content: {
    parameter1: <value>,
    parameter2: <value>
  },
  // Data format
  handleAs: "<String>"
});
In the code above, esriRequest is not returning the actual data. If it were to return the actual data, it would have to wait for the data to be downloaded - which typically takes some time depending on network traffic, available bandwidth and the load on the remote server. Until then, the application would be frozen - not allowing you to interact with it. This is called synchronous behavior. Instead, to keep the application responsive, esriRequest always returns a request object that represents the request you've just made and makes the data available to you later when it is downloaded. This is called asynchronous behavior.
To access the data after it is downloaded, two functions are registered with the request object by calling its method named then. The first function (named requestSucceeded in the example code below, the function name is up to the developer) will be executed if the data retrieved without error. The second function (named requestFailed) will be executed if data download failed for some reason. These functions are also known as callbacks.
function requestSucceeded(data) {
  console.log("Data: ", data); // print the data to browser's console
}

function requestFailed(error) {
  console.log("Error: ", error.message);
}

request.then(requestSucceeded, requestFailed);
Callbacks can also be defined inline:
request.then(
  function (data) {
    console.log("Data: ", data);
  },
  function (error) {
    console.log("Error: ", error.message);
  }
);
Examples
Plain text:
var earthquakes = esriRequest({
  url: "http://earthquake.usgs.gov/earthquakes/catalogs/eqs1day-M1.txt",
  handleAs: "text"
});
earthquakes.then(requestSucceeded, requestFailed);
XML
var earthquakes = esriRequest({
  url: "http://earthquake.usgs.gov/earthquakes/catalogs/7day-M5.xml",
  handleAs: "xml"
});
earthquakes.then(requestSucceeded, requestFailed);
JSON
var earthquakes = esriRequest({
  url: "http://earthquake.usgs.gov/earthquakes/feed/geojson/4.5/week",
  handleAs: "json"
});
earthquakes.then(requestSucceeded, requestFailed);
JSONP
var flickrPhotos = esriRequest({
  url: "http://api.flickr.com/services/feeds/photos_public.gne",
  content: {
    tags:    "earthquakes,us",
    tagmode: "all",
    format:  "json"
  },
  handleAs: "json",
  callbackParamName: "jsoncallback"
});
flickrPhotos.then(requestSucceeded, requestFailed);
Flickr's Public Feed is an example of a web service that dynamically generates data (list of photos) based on some search criteria. The ArcGIS REST API and ArcGIS Portal API are other examples where data is made available on-demand through web services.
The example above uses a special property called callbackParamName. You need to set this property when requesting for data available in JSONP format. The value of this property depends on the owner of the web service, which is usually available from the service documentation. For the flickr service, the value should be "jsoncallback", as specified in Flickr's documentation. For ArcGIS services, callbackParamName is always "callback".
The information and examples above provide the background necessary to write applications that work with remote data. For additional information on the inner-workings of esriRequest, and additional advanced use cases, please read on.
Additional Information and Use Cases
Upload a File
esriRequest is primarily used to download data. However, it can also be used to upload a file from user's computer to a web server. The file can be of any type: Word Document, Excel Spreadsheet, CSV, PDF, JPEG, PNG etc.
To build an application capable of uploading files, the following is required:
- Import relevant source code.
// AMD require(["esri/arcgis/utils", ... ], function(arcgisUtils, ... ) { ... }); require(["dojo/request/iframe"], function(iframe){ ... }); require(["esri/config", ... ], function(esriConfig, ... ) { ... }); - Set a proxy for the application.
esriConfig.defaults.io.proxyUrl = "/proxy";
- Create a HTML Form with File Input control. Users can click on this file input control and select a file from their computer.
The
<html> <head> ... </head> <body> <form id="uploadForm" method="post" enctype="multipart/form-data"> <input type="file" name="attachment" /> </form> </body> </html>formelement has three attributes: id, method and enctype (stands for encoding type).idassigns a unique name to the form so that you can refer to it from the JavaScript code below.methodandenctypeattributes indicate how the file should be uploaded and should always be "post" and "multipart/form-data", respectively.
Theinputelement has two attributes:typeandname. type should always be "file" since you want to present a file control to the user. name attribute uniquely identifies this input element within the form and its value depends on the web service to which you're uploading the file. For example: if you're uploading an attachment to ArcGIS Server Feature Service, the name would be "attachment". - Call esriRequest to upload the selected file.
The File Access with Drag and Drop sample shows a working example of using this method to upload a file. Note: This file upload feature was added in version 2.7 of the API.
var upload = esriRequest({
  url: "<type-web-service-url-here>",
  form: document.getElementById("uploadForm"),
  handleAs: "json"
});
upload.then(requestSucceeded, requestFailed);
Using a Proxy
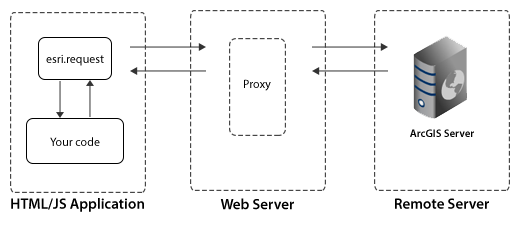
A proxy is a simple script that runs on your web server. It relays a request made by your web application running on a user's web browser to a remote web server and relays the response returned by the remote server back to the application. This is necessary because web browsers allow applications to make requests and retrieve data only from the web server where they are hosted. In other words, without a proxy, an application can only request information from the web server where it is running. This is called same origin policy (additional information on same origin policy info on the Mozilla Developer Network). JSONP is a technique originally developed to circumvent same origin policy.
If you're building an application that requires data from a variety of services that run on different domains, you need a proxy to get around the same origin restriction. The proxy will act as an intermediary between the browser and remote server(s). The diagram below illustrates how this works.

Note: A proxy is not required if your application and all of the data/web services used by it are on the same domain.
For more information on configuring a proxy, and example proxy pages for various server environments, refer to the Using the Proxy Page conceptual help topic.
CORS
CORS stands for Cross Origin Resource Sharing. It is a specification that allows a web server and web browser to interact and determine if a cross-origin request should be allowed. The specification stipulates that the interaction should happen through a set of HTTP headers, which means that both the browser and server should implement the CORS specification. Mozilla Developer Network provide more technical details about how CORS works.
CORS provides a better way to execute cross origin requests relative to using a proxy. esriRequest will avoid using a proxy if the following are true:
- The browser supports CORS. All modern browsers support CORS.
- The target web server supports CORS. ArcGIS Server 10.1 supports CORS out of the box. Versions 9.3 and 10.0 do not have support for CORS but can be easily added by an administrator. enable-cors.org has detailed instructions on how to do this.
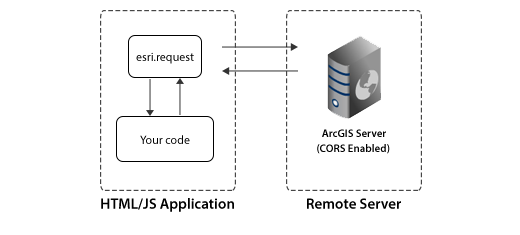
If an application makes requests to an ArcGIS Server, esriRequest will automatically detect if that server supports CORS. However, if a server is known to support CORS, it is recommended that you configure your application manually by telling the API that a server supports CORS:
require(["esri/config", ... ], function(esriConfig, ... ) {
  esriConfig.defaults.io.corsEnabledServers.push("services.myorganization.com");
});
The diagram below illustrates how an application talks to a remote server that supports CORS.

Security
While much of the data and many of the services on the web today are freely accessible to everyone, some are protected and accessible only to some users as designated by the owner/publisher/server administrator. ArcGIS Server provides administrators the ability to control access to their GIS web services using a token-based authentication mechanism. esriRequest has integrated support for ArcGIS token-based authentication.
When developing an application that uses secure ArcGIS services, import the identity manager module and esriRequest will automatically use it to manage the authentication process:
// AMD
require(["esri/arcgis/utils", ... ], function(arcgisUtils, ... ) { ... });
require(["esri/IdentityManager", ... ], function(IdentityManager, ... ){ ... });
Note: The identity manager was added to the API at version 2.5.
Under the Hood: Determining Which Dojo Method is Used
esriRequest uses the appropriate method to execute a request based on the target of the request and what the browser supports. The native method to do AJAX requests is to use XMLHttpRequest(XHR). Because there are subtle differences in how XHR is implemented across browsers, Dojo abstracts away and addresses cross-browser inconsistencies via dojo.xhrGet and dojo.xhrPost. Dojo also provides methods in the dojo.io namespace to do AJAX-style requests with JSONP and to use an iframe to upload files.
esriRequest sits on top of the methods defined by Dojo to provide a clean, simple way to execute AJAX-style requests. Depending on the arguments passed to esriRequest, different Dojo methods are used. The following pseudocode is a rough outline of how esriRequest works.
JSONP:
If JSONP request
  If target on same domain
    Convert to JSON request
  Else If CORS available
    Convert to JSON request
  Else
    If request size is 2000 characters or less
      Call dojo.io.script.get
    Else
      Convert to JSON request
JSON / XML / plain text:
If JSON / XML / PlainText request
  If target not on same domain && CORS not available
    Rewrite request url to use proxy
  If request size is 2000 characters or less
    Call dojo.xhrGet
  Else
    Call dojo.xhrPost
File Uploads:
If File Upload request
  If browser supports native file upload
    If target not on same domain && CORS not available
      Rewrite request url to use proxy
    Call dojo.xhrPost
  Else
    If target not on same domain
      Rewrite request url to use proxy
    Call dojo.io.iframe.send
Additions to esriRequest at Various Releases
Changes to esriRequest have been made at various API releases. Below is a summary of those changes:
- 1.3: Setting useProxy to true will force use of a proxy
- 2.1: useProxy was added to an options argument that allows you to specify the useProxy and usePost options. This method includes a default error handler in cases when the server response is an error. The returned object is dojo.Deferred.
- 2.5: disableIdentityLookup parameter added to options
- 2.7: Added support for uploading files from a user's computer to a server. This can be useful if you want to build an application that allows users to upload files to the server. See the Drag Drop Sample for an example that uses this to upload csv files.
- 3.0: Automatic detection of CORS support and use JSON instead of JSONP where possible